USB Device Not Recognized: While we frequently use USB devices, several of our readers have reported that Windows 10 does not recognize their USB devices. Indeed, the error message may occasionally state that the last USB device you connected to this computer has failed and Windows is unable to recognize it. This can be quite perplexing due to the message’s lack of detail, but fortunately, there is a way to fix this.
Other USB Problems Reported By Our Readers
USB problems are fairly common, and many users have reported that Windows 10 fails to recognize USB devices. Concerning USB issues, users informed us of the following:
1- USB Not Detected, Not showing Up Windows 10
Well, This is a fairly common issue, and if your USB device is not detected or displayed, you should be able to resolve it using one of our solutions.
2- USB Drive Not Showing Up Windows 10
Numerous users have reported that their USB drive does not appear after being connected to their PC. If you are experiencing this problem, we strongly advise you to try the solutions contained in this article.
3- External Hard Drive Not Recognized Windows 10
This issue can occur with flash drives as well as external hard drives. The solutions, however, are identical for flash and external hard drives.
4- Windows USB Not Working
If your USB does not work on Windows, the issue may be with your drivers; therefore, be sure to update them and see if that resolves the issue.
5- Windows USB Ports Not Working
Users reported that their Windows PC’s USB ports are not working. If you are experiencing this problem, be sure to try one of the solutions provided in this article.
What Should I Do If My USB Device Is Not Recognized By Windows 10?
#1:- Update Your Chipset Drivers
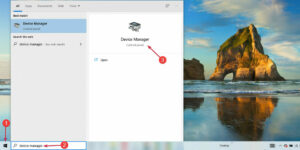
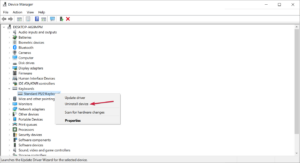
1- Click the Start button, type device manager, and click the resulting app.
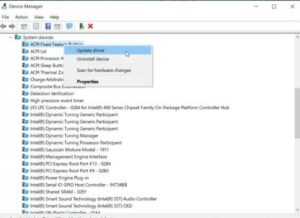
2- Locate the drivers and, using the right-click menu, select Update driver.
3- You should always keep your drivers up to date to avoid errors caused by out-of-date or incompatible drivers. Occasionally, Windows will install them automatically.
The majority of the time, you must manually download drivers. However, this is a process that carries the risk of installing the incorrect driver, which could result in serious malfunctions.
Well, The safer and easier way to update drivers on a Windows computer is to use an automatic tool such as DriverFix, which scans your computer’s hardware and automatically locates the correct drivers.
#2:- Delete Unnecessary Keyboard Drivers From Device Manager
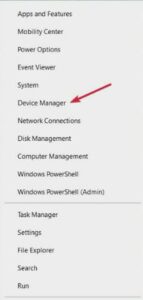
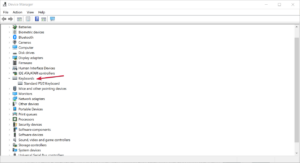
1- Right-click the Start button and then select Device Manager from the list that appears.
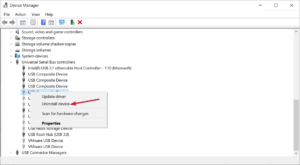
2- Identify the location of your keyboard drivers. Delete all of them by right-clicking the driver and selecting Uninstall device from the context menu.
3- After deleting all drivers, restart your computer; your keyboard should now work properly.
If Windows 10 does not recognize your USB keyboard after unplugging it and reconnecting it while the computer is running, you may need to delete its drivers from Device Manager.
Multiple keyboard drivers have been reported by users, and if you are experiencing the same problem, it is suggested that you delete any unnecessary keyboard drivers.
Additionally, make to see if the USB controller is not disabled. To fix this issue, open Device Manager and find the disabled USB controller. Then, right-click it and select Enable.
#3:- Install Logitech SetPoint
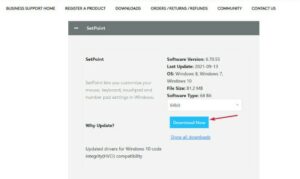
This solution may be applicable to owners of a Logitech keyboard; therefore, if you own one, download and install the Logitech SetPoint software.
Certain users have reported that Windows 10 successfully recognized their USB keyboard following the installation of this tool, so be sure to take that out.
We have no idea if this solution will work with other brands of keyboards, but it’s worth a shot.
#4:- Check Your Keyboard Power Management Settings
1- Click the Start button and select Device Manager from the menu.
2- In the list, locate your keyboard. If the Keyboards section is not present, it may be found in the Universal Serial Bus controllers or Human Interface Devices sections.
3- Once you have located your keyboard, right-click on it and select Properties.
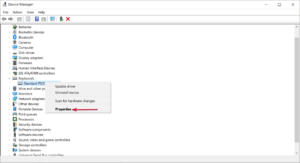
4- Select the Power Management tab and uncheck Allow the computer to turn off this device to make power.
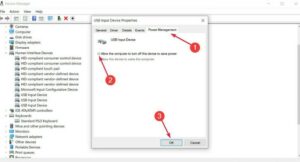
5- Restart your computer to apply the changes.
This feature is only available if you are using a USB keyboard. Obviously, there is no Power Management tab for the laptop keyboard.
#5:- Restart Your Computer/Remove The Battery
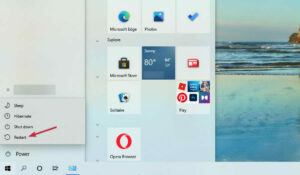
Users report that restarting the computer a few times occasionally resolves issues with USB keyboards. Additionally, some recommend that you unplug and remove the battery from your computer for a few minutes.
We must warn you that removing the battery from your computer will void your warranty, so it’s likely best to take it to a repair shop and have an expert do it for you.
#6:- Disable USB3 Support From BIOS
1- Press F2, F8, or Del to enter BIOS while your computer is booting. Because the key on your computer may be different, you may need to repeat this step several times.
2- Once the BIOS has been launched, navigate to Advanced Settings and select USB Configuration.
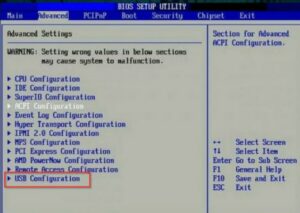
3- Disable USB3 support and save your configuration.
If your laptop is new, it almost certainly came equipped with USB 3.0 ports. Unfortunately, the majority of peripherals do not support this new USB standard. Therefore, you can disable it and see if the issue resolves.
#7:- Uninstall AiCharger + And Kaspersky Antivirus
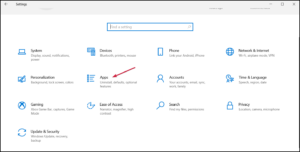
1- From the Start menu, select Settings.
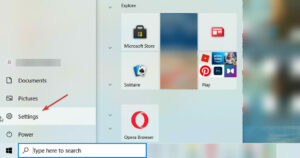
2- Now select Apps.
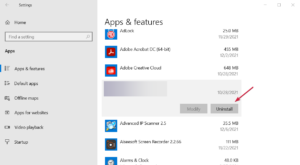
3- On the right pane, scroll down until you find the app and click on it; then click the Uninstall button.
Certain software, such as AiCharger+, has been reported to cause issues with your USB keyboard; therefore, before upgrading to Windows 10, make that this software is uninstalled.
We should mention that this issue could also be caused by your antivirus, so if you’re using Kaspersky, make sure to uninstall it temporarily.
Well, If the problem was caused by your antivirus, we recommend that you upgrade to a more modern version.
Well, It is possible that your antivirus software is not configured to work with the upgraded version of your operating system; therefore, make that you are using a Windows 10 compatible antivirus.
#8:- Turn Off Fast Startup
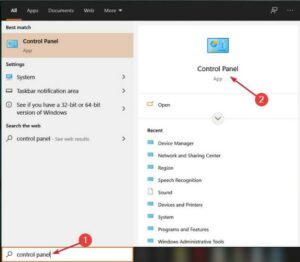
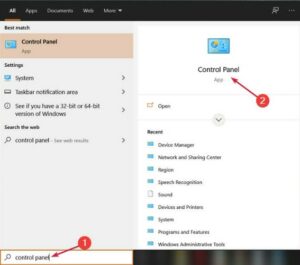
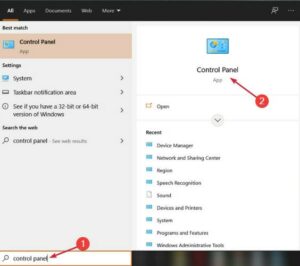
1- In the Search bar, type control panel and then select Control Panel from the list of results.
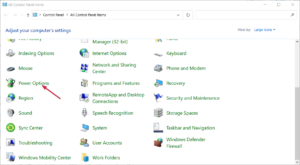
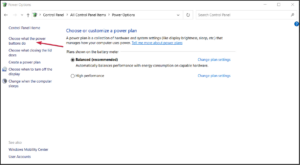
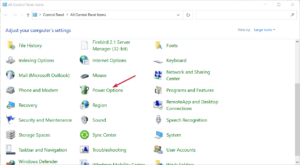
2- When the Control Panel opens, navigate to the Power Options section.
3- Click on Select the function of the power buttons.
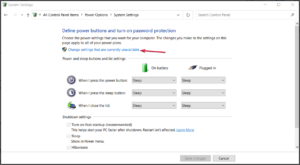
4- Click Change settings that are not available at the moment.
5- Find and disable the Fast-Startup option.
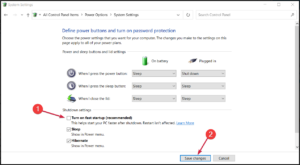
6- Save your modifications and restart your computer.
Occasionally, due to Windows 10’s Fast Startup feature, your USB device may not be recognized by the operating system. This can cause a slew of problems, particularly if you use USB storage to store critical data.
Luckily, by following the steps above, you can easily fix this. While Windows 10 may start a little slower after disabling Fast Startup, all USB device should be properly recognized.
#9:- Partition Your USB Storage And Assign A Letter To It
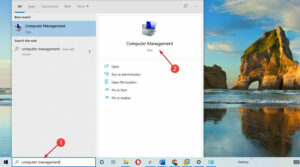
1- In the Search tab, type computer management and then select Computer Management from the list.
2- Click Disk Management when Computer Management begins.

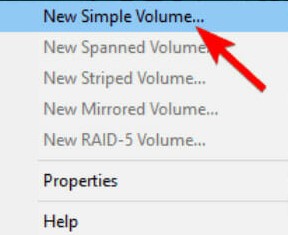
3- Find the USB hard drive that you want to use. If the drive is not partitioned, you should see an Unallocated space icon. Select New Simple Volume from the context menu. To partition your hard drive, follow the instructions below.
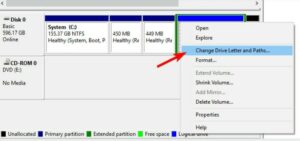
4- If your USB storage device has been partitioned but is still not recognized by Windows 10, you must make that it has been assigned a letter. Change Drive Letter and Paths by right-clicking on it.
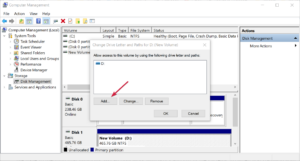
5- Click Add and assign this partition a letter.
Windows 10 cannot recognize your USB hard drive or USB storage device until it has been partitioned and assigned a letter.
We must emphasize that Windows 10 is only compatible with the NTFS and FAT32 file systems, so when partitioning your hard drive, use the NTFS file system.
#10:- Uninstall Hidden Devices From Device Manager
1- Click Start, type cmd, and then select Run as administrator.
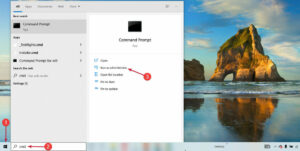
2- When the Command Prompt window opens, paste the following lines into it and press Enter after each one to run them:
set devmgr_show_nonpresent_devices=1

cd

cd windowssystem32

start devmgmt.ms

3- The Device Manager application should start. Click View > Show hidden devices.
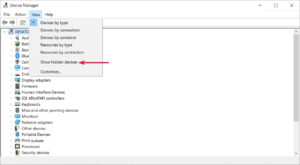
4- At this point, you should expand all sections and delete any grayed-out entries.
5- Once that is complete, restart your computer and reconnect your USB hard drive.
#11:- Delete Unrecognized Device From Device Manager
1- To open Device Manager, right-click the Start button and select it from the list.
2- Expand the section titled Universal Serial Bus controllers and find Unrecognized devices. Select Uninstall device with the right-click menu.
3- Click the button Scan for hardware changes. Windows will not automatically install any missing drivers.
4- Close the Device Manager window.
If you are unable to find an Unrecognized device in Device Manager, skip that step and proceed to step 9 to change the assigned letter.
#12:- Connect Your Hard Drive To The USB Ports In The Back

Our readers have reported having issues with the Seagate hard drive, specifically that the USB device is not recognized when connected to the USB ports on the front of the computer.
Even if you are not using a Seagate hard drive, you can test this by connecting your USB hard drive to port on the back of your PC.
According to our readers, the ports on the front occasionally do not generate enough power, which is why it is preferable to use the USB ports on the back.
Additionally, if you have a USB hub, avoid using it and directly connect your USB storage to your computer.
#13:- Replace The Hard Drive Letter Using The Diskpart Tool
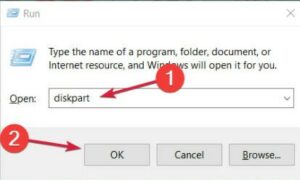
1- In the Run dialogue box, press Windows key + R and type diskpart. To run it, press Enter or click OK.
2- After that, the Command Prompt window will open. To run the command, type list volume and press Enter.
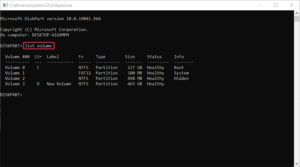
3- Find your USB storage device from the list. It shouldn’t be assigned a drive letter.
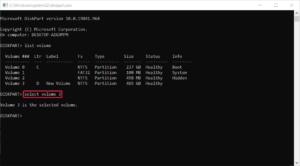
4- Press Enter after typing select volume 3 (we used volume 3 in our example, but you should use the volume number that corresponds to your USB storage).
5- Now, type assign letter Z (or any other un-used letter) and hit Enter.
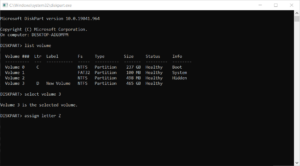
6- Exit Command Prompt and check that the USB storage device is recognized.
#14:- Add The USB Printer Manually
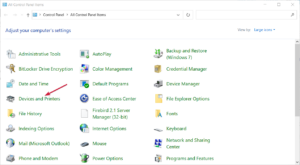
1- In the Search tab, type control panel and then select Control Panel from the list of results.
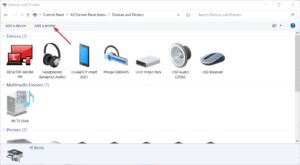
2- Select the devices and printers that you want to use.
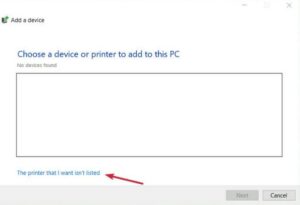
3- Select the Add a printer option.
4- Click The printer I’m looking for isn’t on the list.
5- Decide Click the Next button to add a local printer or a network printer with manual settings.
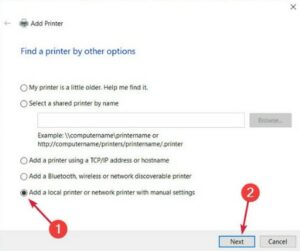
6- Select Use an existing port and USB0001 from the hit-down menu, then click Next.
7- At this point, choose the printer manufacturer and model. Then click Next.
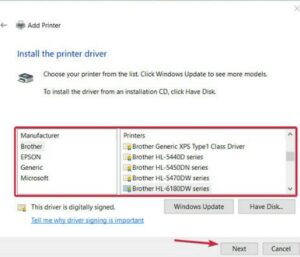
8- Select Utilize the currently installed driver (recommended) and enter the printer’s name.

If Windows 10 does not automatically recognize your USB printer, you may need to manually add it. To achieve this, follow the steps outlined above.
Bear in mind that if you do not have the most recent drivers for your printer, it may not be recognized. Visit the manufacturer’s website for your printer and download the most recent drivers.
#15:- Check Power Management For USB Root Hub
1- Right-click the Windows Start button and select Device Manager from the context menu.
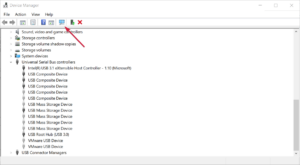
2- Navigate to the section on Universal Serial Bus controllers and find the USB Root Hub.
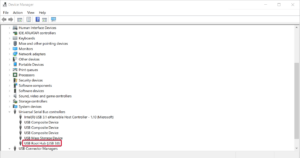
3- If you have more than one USB Root Hub, you must repeat this step for each one.
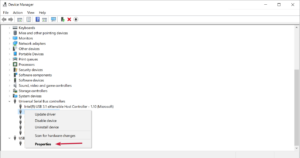
4- From the context menu, right-click USB Root Hub and select Properties.
5- Make to the Power Management section and uncheck Allow the computer to turn off this device to conserve power.
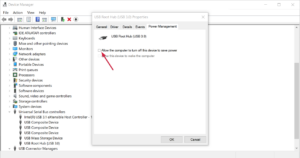
6- Apply the changes and repeat the procedure for each USB Root Hub listed in Device Manager.
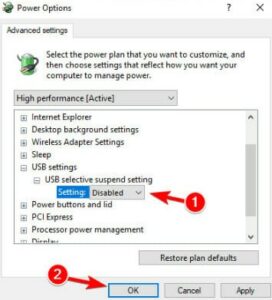
#16:- Change USB Selective Suspend Settings
1- In the Windows Search tab, type control panel and then select the app from the results.
2- Select Power Options from the Control Panel.
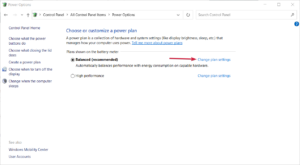
3- Find the plan you’re currently viewing and click Change plan settings.
4- Click Change advanced power settings from the menu.
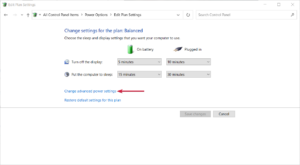
5- Find USB Settings and click on USB selective suspend. Change the setting to Disabled for all entries. Well, To save the changes, click Apply and OK.
While we’re on the subject of Power Options, we should mention that some users have reported that disabling Fast Startup resolves port issues, so you may want to give that a try as well.
As you can see, there are countless instances in which Windows 10 fails to recognize USB devices, and if you are experiencing issues with USB devices on Windows 10, we hope that our solutions are helpful.

